Getting Started
How should I proceed to get up and running?
-
Download and install the Arduino IDE from Arduino.cc (minimum version 1.6.12)
-
Enter the Board Manager (Tools->Boards Manager), search for 'industruino' and install the 'Industruino SAMD Boards' package.
-
Windows driver (if needed): https://static.industruino.com/downloads/drivers/drivers-industruino-windows-0.0.1.zip
-
In the library manager (Sketch->Include library->Manage libraries) search and install the following libraries (also available on our github):
-
Indio (essential for IND.I/O functions, not needed for PROTO)
-
UC1701 (LCD functions)
-
-
Connect the Industruino to your computer via the USB-micro cable.
-
Select "Industruino D21G" from Tools->Board
-
Select your serial port from Tools->Port
-
Upload your first sketch. Each library installed in step #3 has example sketches which can function as the starting point of your application. (ex. File->Examples->Indio).
-
Read our github documentation page for more detailed information on specific product functions; https://github.com/Industruino/libraries
For 1286 topboard (EOL):
- Follow the assembly guide to assemble your kit.
-
Download the support file package. Direct link: for Arduino IDE 1.6.5 or for Arduino IDE 1.0.* (versions above Arduino IDE 1.6.5 not supported for 1286).
-
Install the included libraries, and any others you may need from our github repository.
- Install the included board definition files. If you use Windows also install the included CDC USB->Serial driver.
- In the Arduino IDE go to Tools->Boards and select "Industruino 1286".
- You are now ready to use the example sketches which are included in the libraries as a starting point for your own applications.
- Follow the assembly guide to assemble your kit.
- The 32u4 works with any version of the Arduino IDE, as it is a standard Leonardo board.
- Download the UC1701 display library and any others you want to use (e.g. Indio in case you have an IND.I/O) from our github repository.
- In the Arduino IDE go to Tools->Boards and select "Arduino Leonardo".
- You are now ready to use the example sketches which are included in the libraries as a starting point for your own applications.
How do I write my first sketches for Industruino?
PROTO kit
The PROTO kit functions as a standard Arduino: you can use Arduino example sketches and any Arduino code to control the I/O. All standard pins are available at the green screw terminals, as documented in the pinout maps below. The pre-loaded demo code is available on github.
- To drive LCD screen please use our UC1701 library with the example sketches or the U8G or U8G2 library for extended functionality.
- To communicate with your Ethernet expansion module please use our included Ethernet library.
- For GSM/GPRS functionality use our 2G expansion module.
- If you do not use the IDC expansion port for Ethernet or GSM/GPRS, you can use some of these pins, as documented in this IDC pinout map.
IND.I/O kit
The IND.I/O kit interfaces with higher voltages (12V/24V) and has I/O functions a standard Arduino doesn't have (0-10V, 4-20mA). Therefore you need to control the I/O with the included Indio library. This library has similar code syntax as standard Arduino I/O functions, and will take care of all the configuration and interfacing, leaving you to focus on getting the job done. Use the included example sketches as a starting point for your custom code. You cannot control the digital and analog I/O channels with the standard digitalWrite/analogRead functions, you have to use the Indio library.
The pre-loaded demo code is available on
github
.
- To drive LCD screen please use our UC1701 library with the example sketches or the U8G or U8G2 library for extended functionality.
- To communicate with your Ethernet expansion module please use our included Ethernet library.
- For GSM/GPRS functionality use our 2G expansion module.
- If you do not use the IDC expansion port for Ethernet or GSM/GPRS, you can use some of these pins, as documented in this IDC pinout map.
Downloads
All our support files are maintained on Github. You will find all downloads and detailed documentation on the github page.
- Documentation repository (Documentation regarding library use and peripheral function).
- Demo code repository (The same code that comes pre-loaded on your Industruino, can function as starting point).
Datasheets, Guides and Diagrams
IND.I/O
- IND.I/O D21G Quickstart guide NEW! - the printed leaflet included with every Industruino IND.I/O D21G
- IND.I/O D21G pinout map - shows how everthing connects inside Ind.I/O powered by ATSAMD21G18 MCU
- IND.I/O datasheet PDF - shows technical specifications of the Ind.I/O kit
- IND.I/O user manual - full printable user manual
- PROTO D21G Quickstart guide NEW! - the printed leaflet included with every Industruino PROTO D21G
- PROTO D21G pinout map - shows how everything connects inside Proto powered by ATSAMD21G18 MCU
- PROTO datasheet PDF - shows technical specifications of the PROTO kit
- Ethernet Quickstart guide NEW! - the printed leaflet included with every Industruino Ethernet expansion module
- Ethernet datasheet PDF - shows technical specifications of the Ethernet expansion module
- GSM/GPRS Quickstart guide NEW! - the printed leaflet included with every Industruino GSM/GPRS expansion module
- GSM/GPRS user manual - full printable user manual
- GSM/GPRS datasheet PDF - shows technical specifications of the GSM/GPRS expansion module
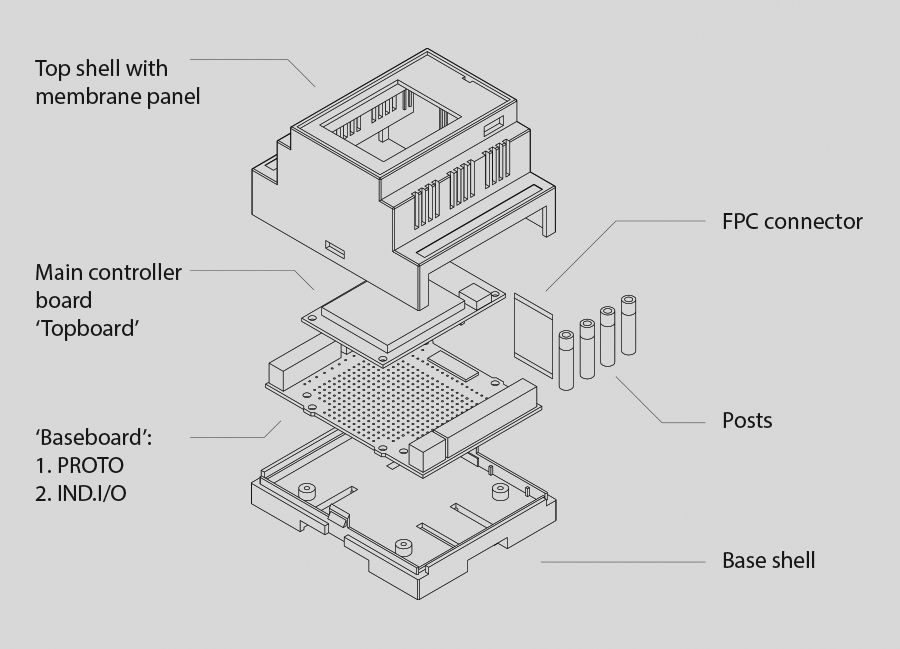
- Industruino assembly guide - shows step by step how to assemble the Industruino kit.
- IND.I/O 32u4 pinout map - shows how everything connects inside Ind.I/O powered by Atmega 32u4 MCU.
- IND.I/O 1286 pinout map - shows how everything connects inside Ind.I/O powered by AT90USB1286 MCU.
- PROTO 32u4 pinout map - shows how everything connects inside Proto powered by Atmega 32u4 MCU.
- PROTO 1286 pinout map - shows how everyting connects inside Proto powered by AT90USB1286 MCU.
White Papers
- Watchdog Timers - discusses the use of watchdog timers to improve the reliability of your installation.
- 1286 on Linux - discusses the process of setting up your development environment on Linux.